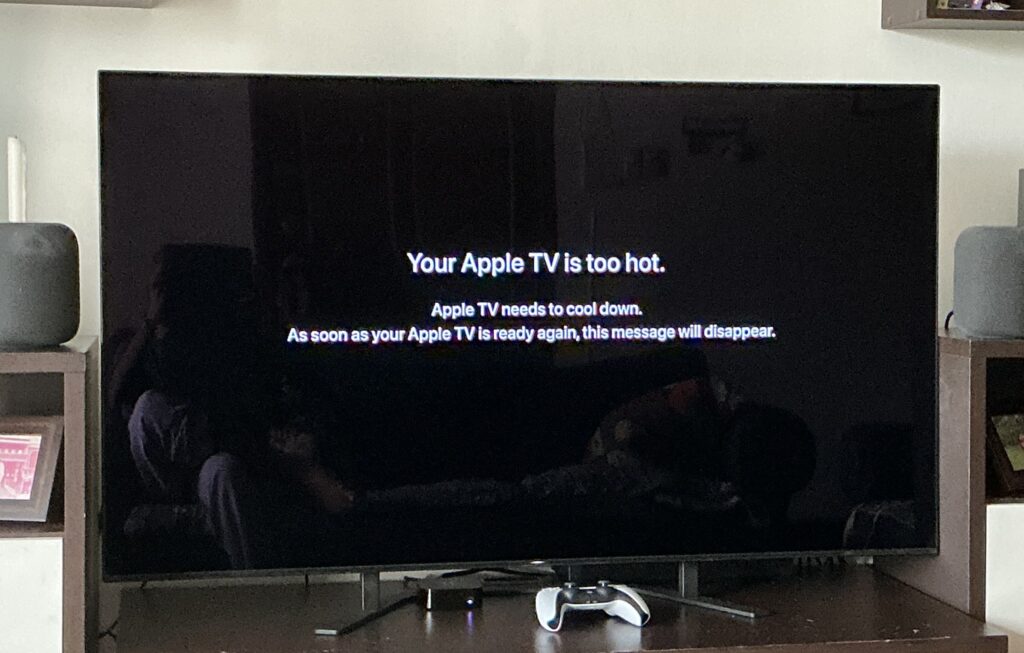
I have been streaming content on Apple TV 4Ks for quite some time. This post is about an issue I discovered specifically with the 3rd Gen Apple TV 4K. When streaming high bitrate 4K HDR content on Plex, it overheats and starts stuttering. If you keep playing, it eventually halts, as shown below.
Apple TV 4K (3rd Gen) has overheated
Now, I was playing similar content on the Apple TV 4K (1st Gen), but never saw these issues. The difference is, Apple removed active cooling on the 3rd Gen model and slimmed down the unit. As per Apple, the SoC is efficient enough to not require cooling. And while that may be true for normal content streamed from one of the many streaming platforms, the passive cooling simply isn’t enough when streaming high-bitrate content like Blu Ray rips on Plex. Even though using the Air Conditioner partially alleviates the problem, it doesn’t solve it completely.
I briefly considered selling it and buying a 1st or 2nd Gen used. But then, I realised that wasn’t a sustainable solution long-term, so decided to take matters into my own hands & improve the cooling using a heatsink. I also decided to do proper tests with different modes, for science.
Test Methodology
Baseline : Baseline is the temperature of any passive component near the Apple TV 4K. In this case, I chose the TV stand. The aim is to abort the test till the baseline temperatures are within a 2C window.
Standby: Temperature of the Apple TV 4K in standby mode doing background tasks only (As a HomeKit hub, it needs to track all the HomeKit devices in the house and process and upload surveillance videos from 2 cameras).
Video: Measure the temperature of the Apple TV while playing various kinds of video with different configurations at different intervals.
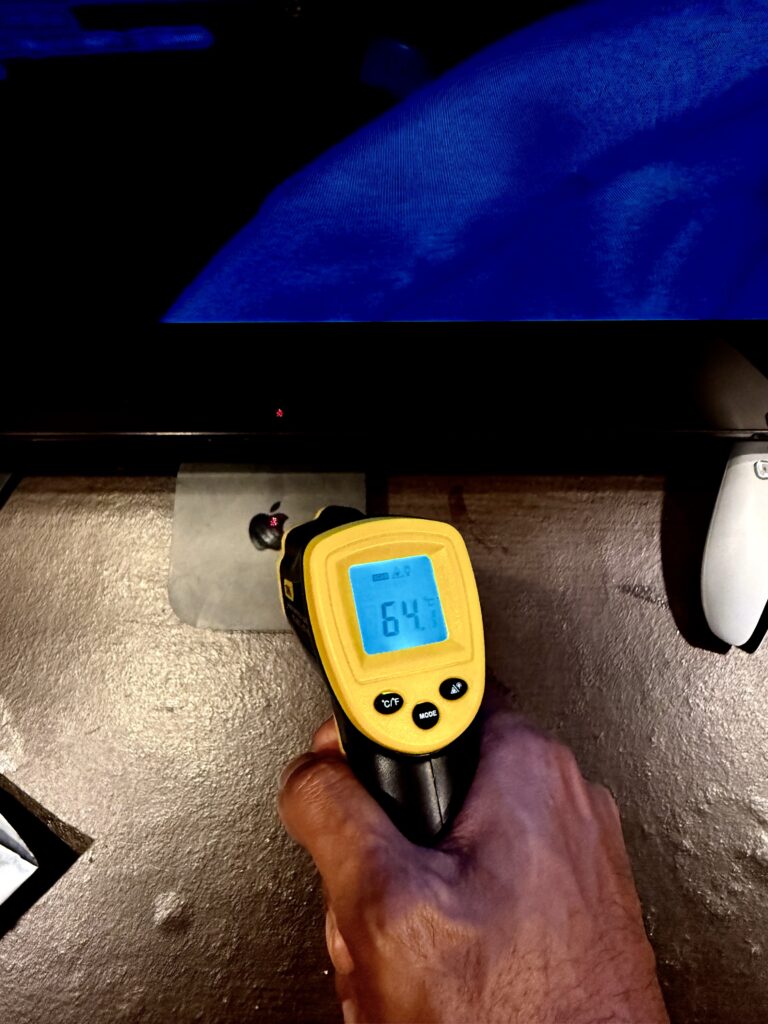
All measurements done with an infrared thermometer from a distance of 15 cm. The spot measured is the middle of the Apple logo on the top of the unit. After each test, I waited for the Apple TV to return to its standby temperature and stay there for at least an hour (For the internal components to cool down, too). This meant, most days, I could only do 1 or 2 tests and it took days to finish everything.
Apple TV 4K (3rd Gen) at 64 C
Test Results
The test results were not surprising.
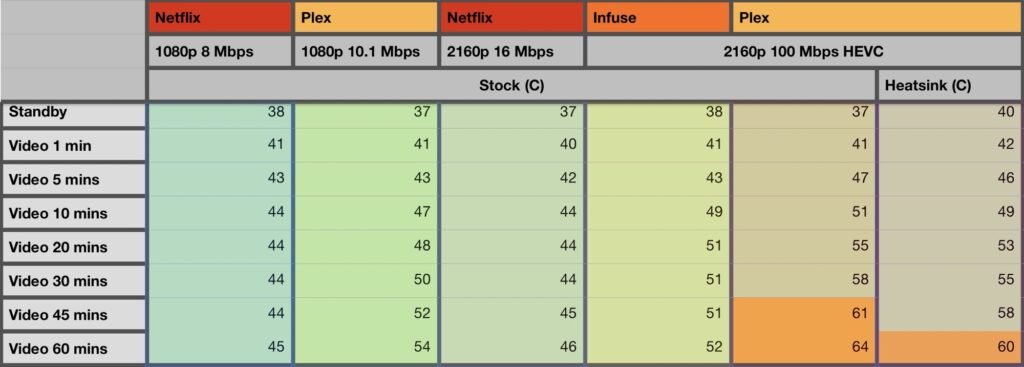
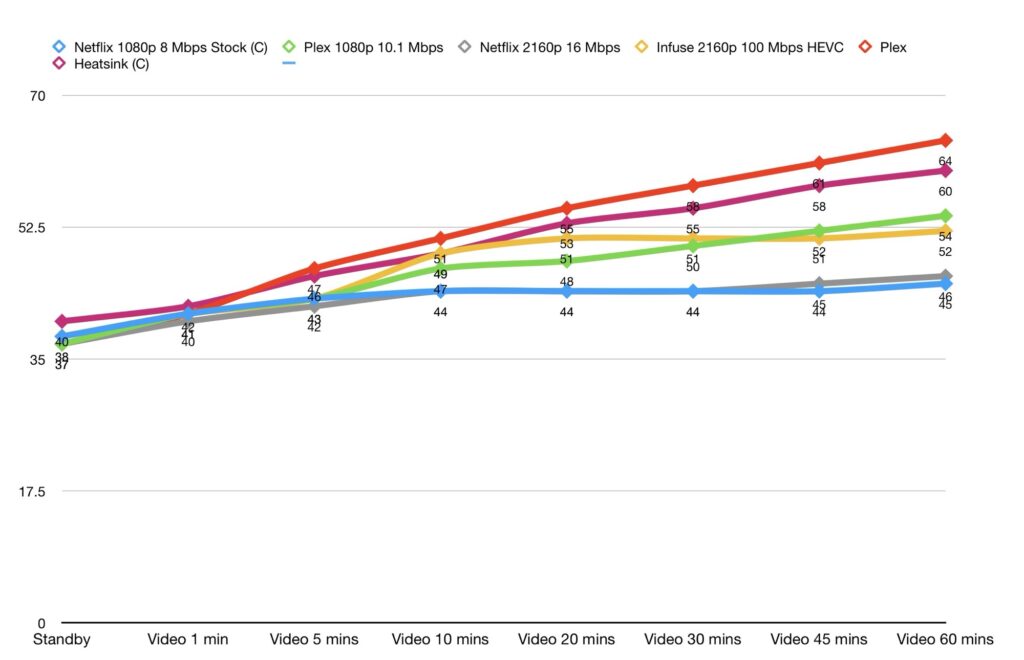
Apple TV 4K temperature over 1 hour
Netflix : As expected, the unit worked well with no stuttering or freezes for both 1080p and 2160p content. The temperature rose to 9C above standby in both cases but stayed stable afterwards. This is not surprising because streaming content has comparatively low bitrate and if there was an issue here, it would be detected & reported by many more people.
Infuse : I tested only high-bitrate content on Infuse. The temperature went up 6C higher than Netflix (considering the bitrate is 10 times more) but surprisingly stayed more or less stable over 45 mins. This proves that the Apple TV 4K itself does not struggle with playing high bitrate content, as long as the app is correctly coded.
Plex : This part shows how bad Plex is at decoding video. Even the 1080p video showed the temperature rising continuously till the end of the test, not stabilising at all. In fact, the temperature with 1080p rose to 54C, even above high bitrate 2160p on Infuse.
High-Bitrate 2160p video on Plex yielded pathetic results. The temperature crossed well past 64C and stuttering started around the 42 min mark. It didn’t shut down in 1 hour, but I am sure if I had the time to continue the test longer, it would have at some point.
Apple TV 4K temperature graph over 1 hour
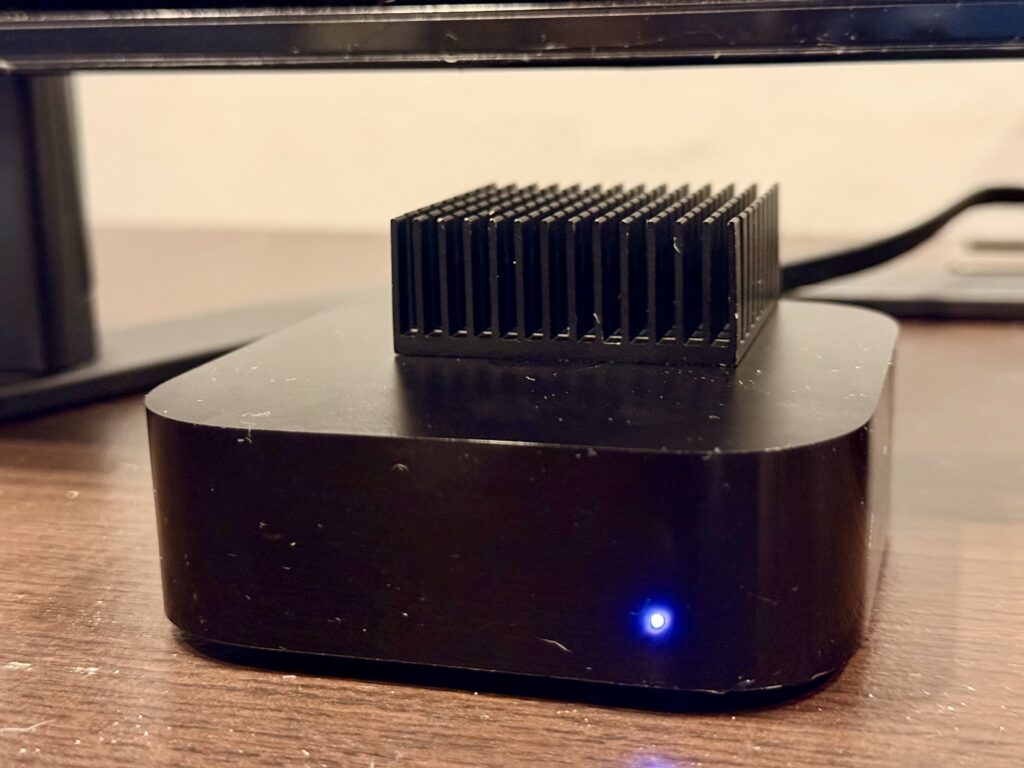
Adding a Heatsink (small one I had lying around) actually caused the standby temperature to be slightly higher than normal, probably because at this stage it is also blocking some heat dissipation. Eventually, it seems to delay the heat and hence the stuttering, by around 15 mins. I am not sure if it would completely prevent the Apple TV from shutting down.
Apple TV 4K (3rd Gen) with a small Heatsink
I could buy bigger heatsinks and connect them to both the upper and lower surfaces of the Apple TV and place it horizontally for maximum effect. But why should I mutilate my gadget further because Plex doesn’t work well?
If Plex doesn’t fix the issue by the time it runs out of warranty, I may consider opening up the Apple TV and connecting the heatsinks directly to the internal components for the best heat disipation.
Conclusion
Plex is very inefficient at decoding video. Apparently, Plex uses a CPU decoder instead of Apple’s Metal API. For high-bitrate content, there’s runaway heating causing stutters and eventually causes the Apple TV to crash. This post says Plex has been working to correct this, but that was almost 1.5 years ago, so no idea when this will actually happen.
Apps coded properly like Infuse have no issues handling high–bitrate content. The temperature rises initially , but stabilises after some time.
The Apple TV 4K (3rd Gen) struggles with heat dissipation with the CPU operating above a certain threshold, especially compared to the previous generations equipped with a fan. Adding a Heatsink to the Apple TV helps with the heat dissipation somewhat.
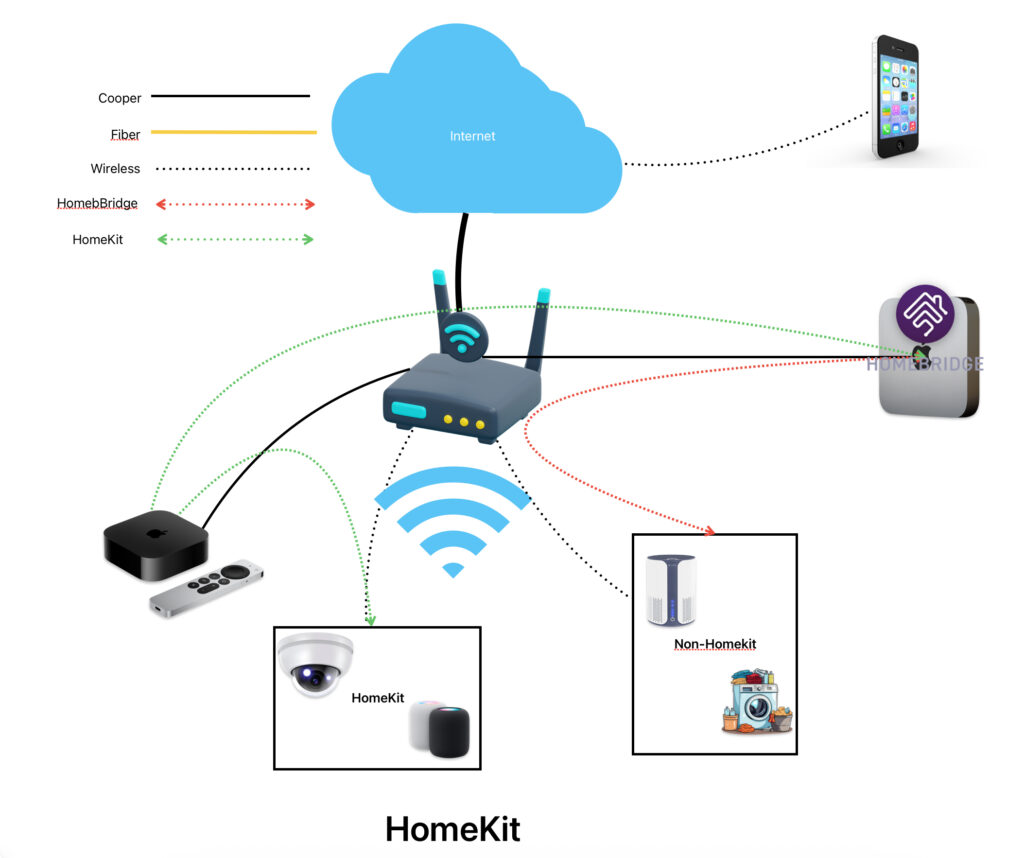
I recently did some pretty complicated configurations on my Synology NAS & subsequently the Mac Mini & decided to make diagrams to document how things communicate with each other. The below sections describe the traffic flow for Homebridge & Plex on my home server.
Homebridge
The Homebridge traffic flow is relatively straight forward.
Traffic flow, Homekit
Homebridge acts as a bridge between IoT devices and Apple’s HomeKit. There are many 3rd party plugins for different types of devices. The plugins are searchable/downloadable from the app itself.
Homebridge polls your IoT devices regularly (depending on how the plugins are built) and gets status information, storing it in a local database
Homebridge shows up as a HomeKit bridge to your HomeKit home hub and exposes all its connected accessories.
There’s a fair bit of mDNS involved for device discovery, so make sure your router allows Layer 2 multicast between the wired and wireless networks.
Plex
There are 2 use cases here, both a bit complicated
Plex Home Media Streaming
Traffic flow, Plex Media Streaming
Plex Media Server is installed on my Mac Mini and can access all my media.
For devices on the local network, streaming is straight forward, the devices access Plex Media Server and stream the media.
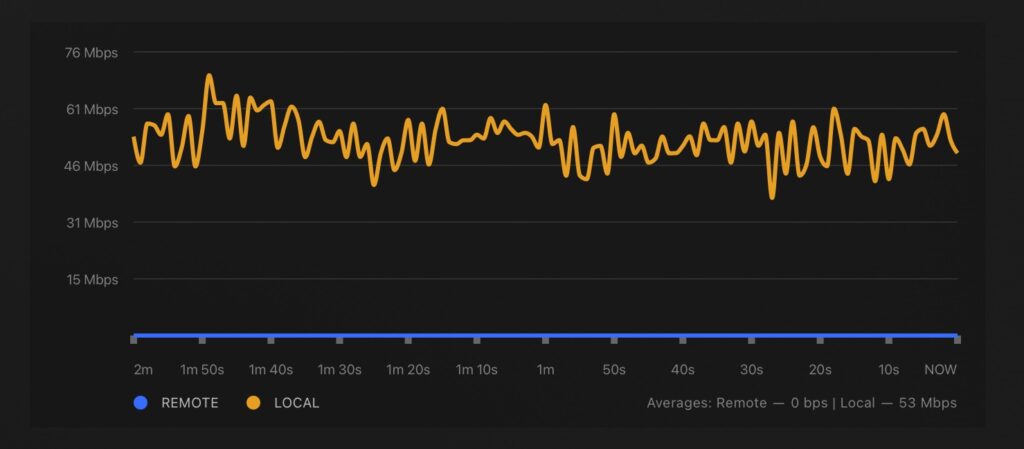
Plex Streaming graph
For devices on the internet, I needed to setup a Cloudflare tunnel for remote access. This is because my ISP doesn’t provide a Public IP via which I can establish direct inbound access. Cloudflared establishes a tunnel outbound from my NAS to Cloudflare’s servers. Devices on the internet use DNS mapping on a domain name to locate the tunnel endpoint and stream media through it.
Plex IPTV Streaming
A few weeks ago, I figured out how to integrate my IPTV service with Plex. Now, Plex by itself doesn’t support IPTV services, but it does support TV tuners. That’s where Threadfin comes in.
Traffic flow, Plex IPTV Streaming with threadfin
So, there are 2 separate, independent traffic flows we need to consider.
IPTV Control Traffic
Before IPTV streaming can start, all the devices involved need to have the correct information. This is how it goes:
Threadfin fetches the channel list from the IPTV provider using an authenticated .m3u playlist
Threadfin fetches the programme guide from the IPTV provider using an authenticated .xml file
Threadfin allows you to filter both the above to reduce the list of channels sent to Plex.
Threadfin exposes itself as a TV tuner to Plex. Plex fetches the filtered list of channels and EPG information from Threadfin.
One quirk with Threadfin is that it stores the original playlist in its memory, so the container may use up a lot of RAM. My container was using 2.6GB RAM with 113k channels in the playlist. After I asked my IPTV provider to trim it, currently it is using 800MB with 37k channels.
IPTV Media streaming
Threadfin doesn’t participate in the actual media stream. When a channel is selected on Plex to be viewed, Threadfin provides Plex with the actual streaming URL.
Once Plex has the original URL, it starts fetching the stream directly from the IPTV server and provides it to all client devices, local or remote, using the same mechanism as media streaming.
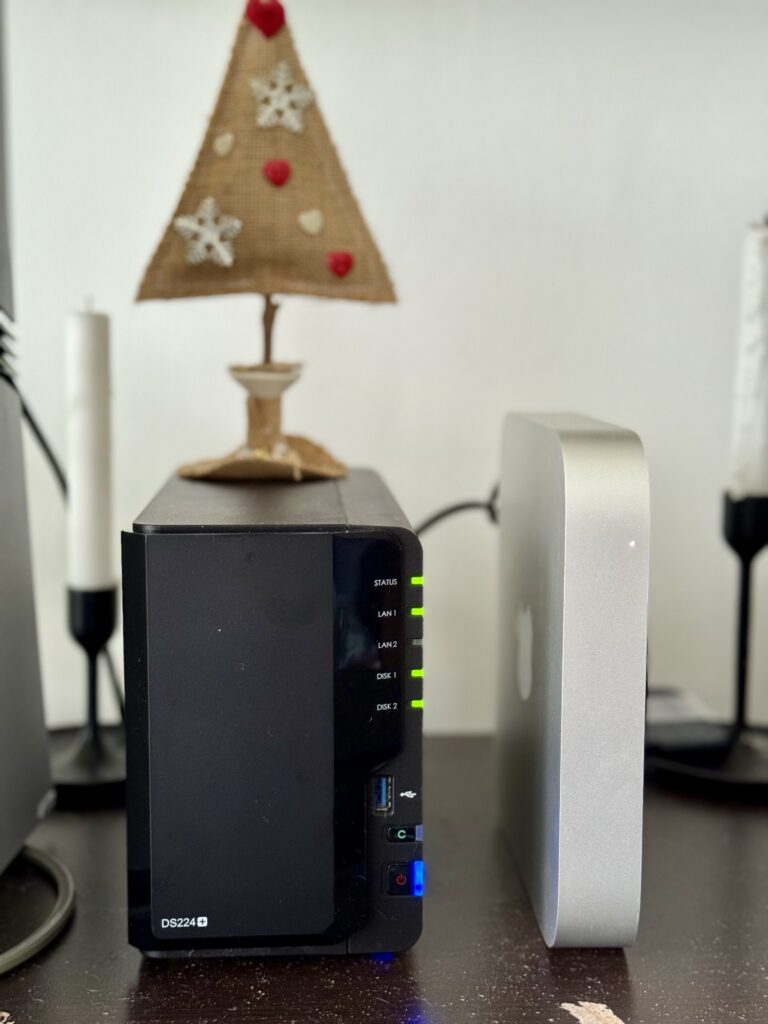
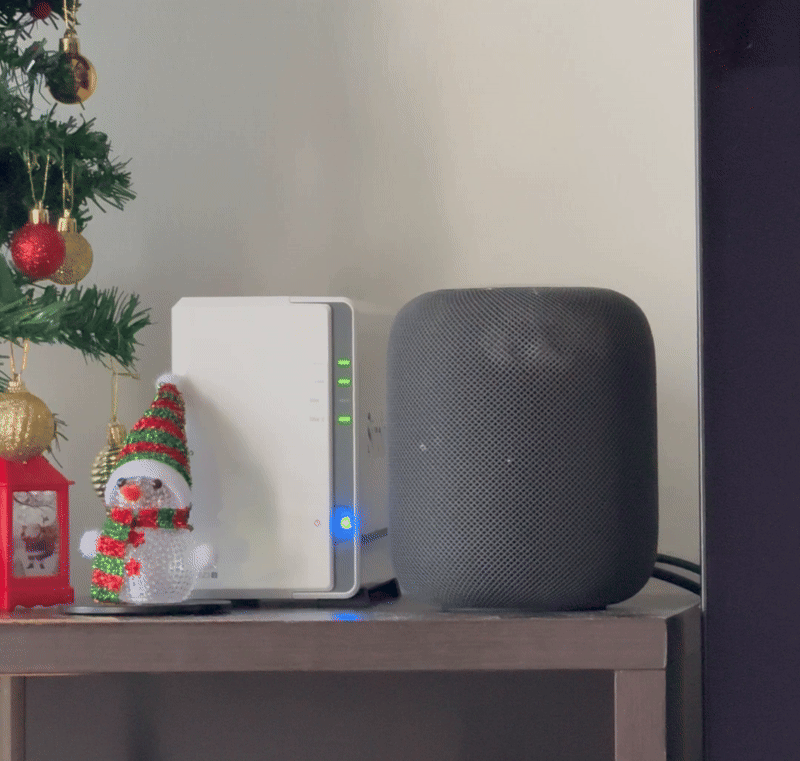
I had been using my Synology NAS for a few months now. However, as I started to do more and more with it, its inherent lack of processing power started to irk me. The CPU was too slow, the RAM too limited. More than that, its ugliness on my living room shelf disgusted me. Eventually, I decided to replace it with a Mac Mini.
Synology DS224+ next to my Mac Mini
Since I was anyways using the NAS more as a computer than for storage (a measly few hundred GBs), the choice was not difficult. I got a good deal on a used Mac Mini M2 Pro and went about migrating my data and services from the Synology.
Remote Access
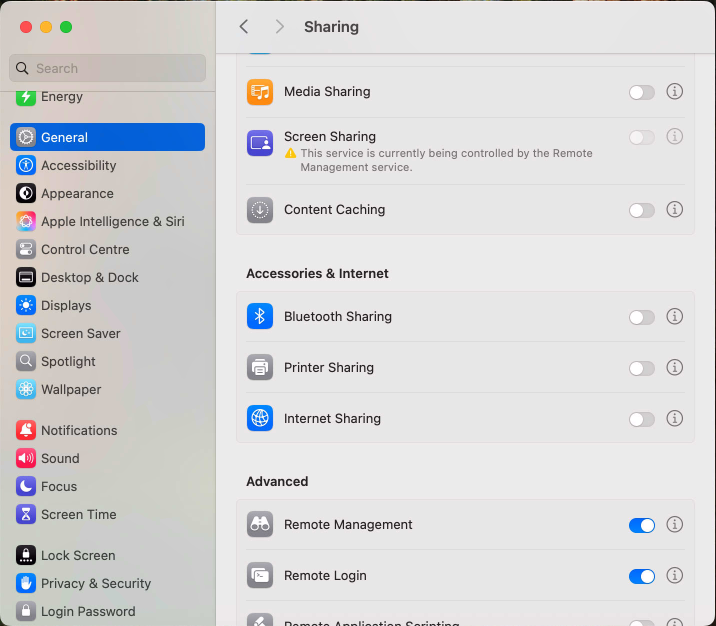
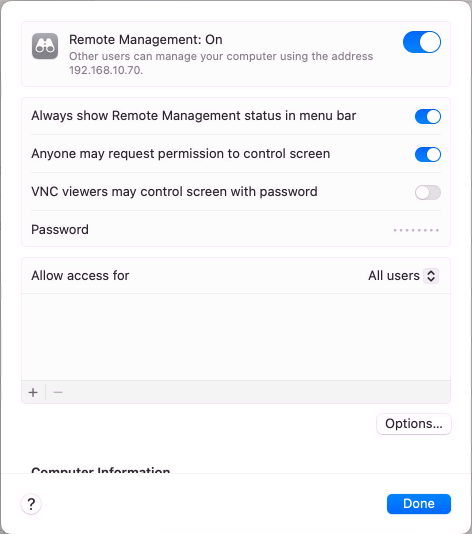
Since I planned to use the Mac Mini as a headless server, the first thing I needed to do during setup was enable remote access. I used my TV as the initial display. Luckily, macOS has built-in VNC & SSH servers and enabling them was as simple as checking a few boxes.
Remote Management and Remote Login, macOS
Remote Management, macOS
With an Apple only environment, you can have better security by
Selecting the “Remote Management”, not the “Screen Sharing” option
Not selecting the “VNC viewers may control screen with password”
Using VNC over SSH when connecting with clients over the internet
The above will break compatibility with most commercial VNC applications. I like Screens 5 & Termius for VNC and SSH respectively. Both apps are paid, but quite powerful.
After verifying that remote access was working, I disconnected the TV, keyboard and mouse for good & haven’t needed them since.
Docker & Threadfin
The service I was most worried about was Threadfin, because it is not natively supported on the Mac and I need to run it within docker.
Thankfully, docker desktop works quite seamlessly on the Mac and the settings & environment variables look similar to container manager on Synology. My only problem was, I couldn’t get the container to auto-start after reboots, using environment variables in the GUI. Eventually, I could get it to work via the terminal
docker update --restart always <container_id>
Once it worked, I could clearly see the performance difference. While on Synology, the container took approx 2-3 mins from start to being usable, on the Mac, it takes less than 10 seconds.
PS: You can’t fetch new images from docker’s repository till you click on the verification link sent via email, if you have created a new account.
CloudflareTunnel
Cloudflare tunnel is installed via homebrew. It is as simple as copy/pasting a few commands via Terminal. Since the configuration of the tunnel is handled from the Cloudflare dashboard, there are no further steps required on the Mac itself.
Bonus feature, Cloudflare also allows you to setup VNC & SSH connections to your device, exposing a web interface to any browser you want to use it with. Over the same tunnel.
Plex & Homebridge
Plex is supported natively on the Mac and installing it is as easy as mounting the disk image. It detected Threadfin as a DVR fairly easily.
At first, Plex refused to detect media content from my external SSD, which was an APFS encrypted volume. However, after erasing it and setting it up as un-encrypted, it was detected fairly quickly. Funnily, once I encrypted it again, it continued to work, so I am not sure what the original problem was.
Homebridge is also natively supported on the mac and is installable via homebrew. Thankfully it comes with backup/restore functionality out-of-the-box, which worked seamlessly. Just had to keep in mind 2 things:
The plugins are not backed up and restored, so these need to be installed on the new machine manually before restoring the backup
I had to delete the bridge from my home app and add it again for my device status to work properly.
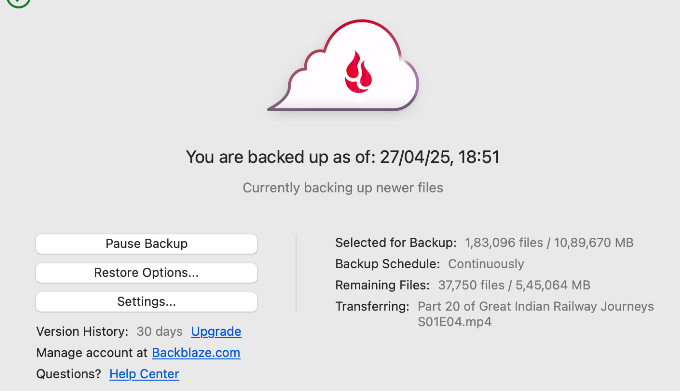
Backblaze Backup
Unlike my NAS, there’s no disk redundancy on the mac, so I chose to subscribe for Backblaze’s backup service. It is quite cheap, allows unlimited storage and if you need, they can even send you a USB drive to restore your content from.
Backblaze backup on macOS
It took around 2 days for the client to upload all my data in auto-throttled mode.
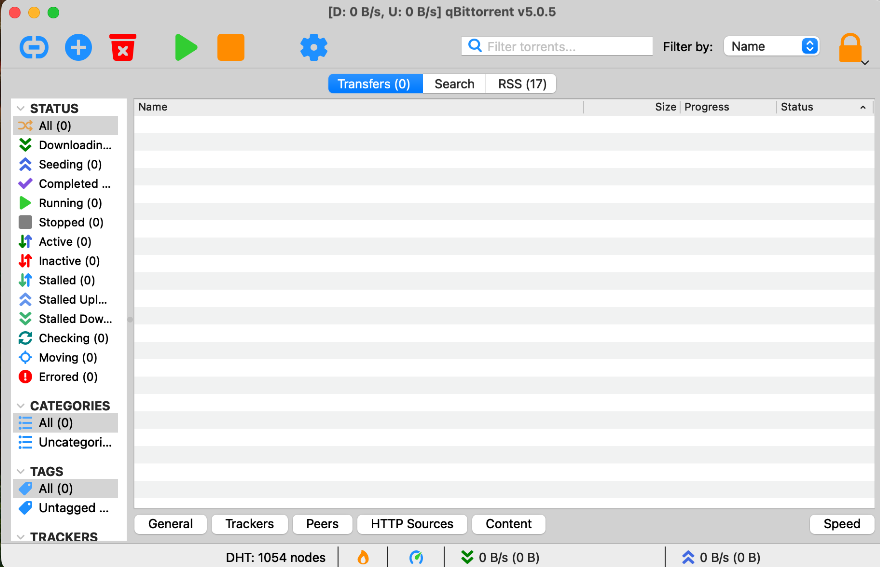
qBittorrent
For macOS, most people recommend Transmission to download torrents and the app itself is rock-solid, however, it is lacking support for RSS feeds. One can use add-ons like flexget to enable this, but I couldn’t get it to work.
Eventually, I settled for qBittorrent, which, although dated, has all the necessary features and works quite well. Its web UI is near-unusable on mobile phones, though and I couldn’t find a client on the App Store which works well, yet.
qBittorrent v5.0.5 on macOS
Resource & Environmental monitoring
I use TG Pro to monitor environmental parameters like temperature, fan speeds. It is a paid app, but is quite cheap and requires a one-time-payment only.
I use stats to monitor the CPU, GPU, Memory and bandwidth utilisation on the Mac. It is open-source and installable via homebrew.
Stats & TG Pro on Mac Menu bar
Summary
Overall, what I miss most from my Synology is its easy-to-use web interface and cloud connectivity features, which worked seamlessly. Even after a lot of effort, I cannot achieve the same level of integration on the mac, as all the services are from separate providers & lack cohesion.
However, the sheer computing power and the lack of physical ugliness more than makes up for it.
Recently, I had been looking to move my pirated media away from the Mega + Infuse combo (Mega had been throttling transfers, causing choppy videos). Additionally, I was paying monthly subscription fees for both. So I decided to move everything to a NAS. My main requirement was for the NAS to not be based on x86-64 architecture and especially not an Intel processor. After a tight battle with the TerraMaster F2-212 and ASUS Drivestor 2, I decided to go with the Synology DS223j.
Even though the TerraMaster and Asustor provided more value for money and in some cases more features (Hot swappable drives, 2.5Gbps ethernet expansion), Synology won me over with their superior software and cloud-based backend.
Overall, few weeks later, I don’t regret getting the Synology DS223j at all.
NAS doing its NAS-ing
Storage
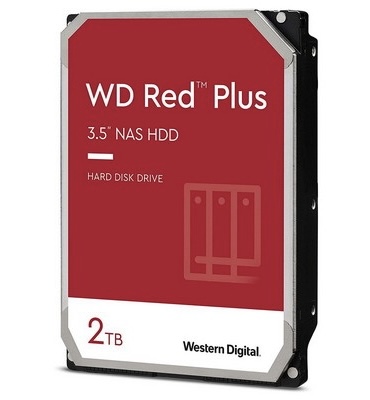
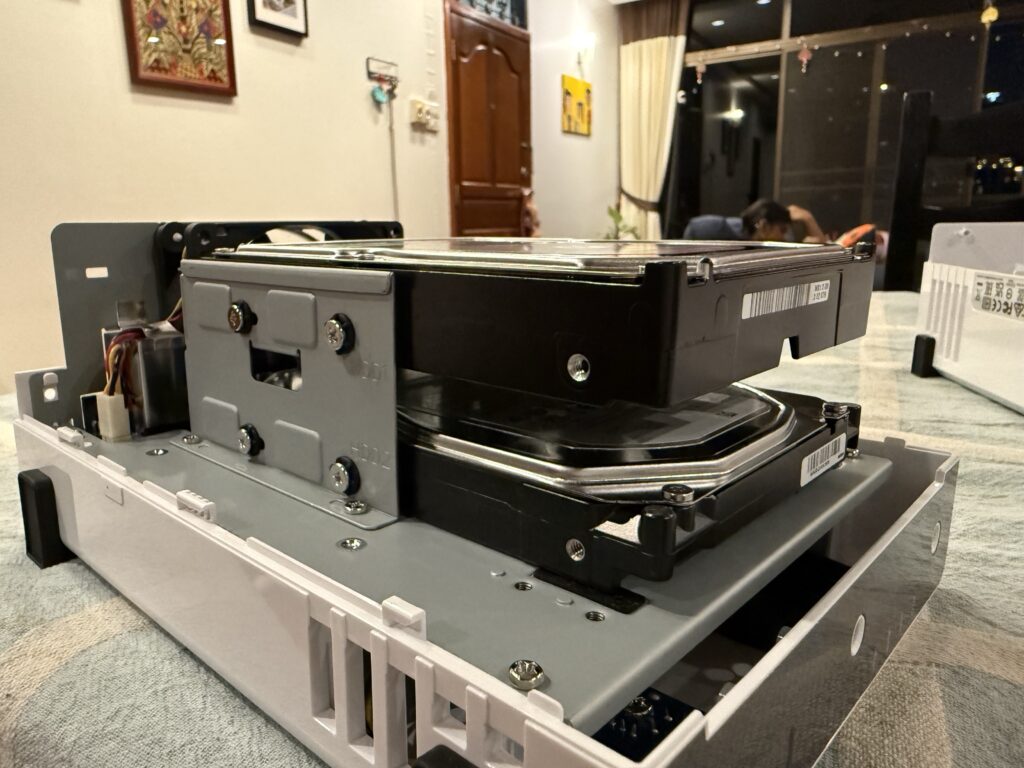
The first action after ordering the NAS was to order the drive(s). I didn’t need much storage space, but I did need redundancy, so I went with 2x2TB drives.
WD Red Plus HDD WD20EFPXSeagate IronWolf 2TB HDD S2000VN003
Following best practice, I got 2 drives with similar performance numbers, but different models, as I didn’t want them to fail around the same time. This happens especially if you buy 2 drives of the same model from the same batch.
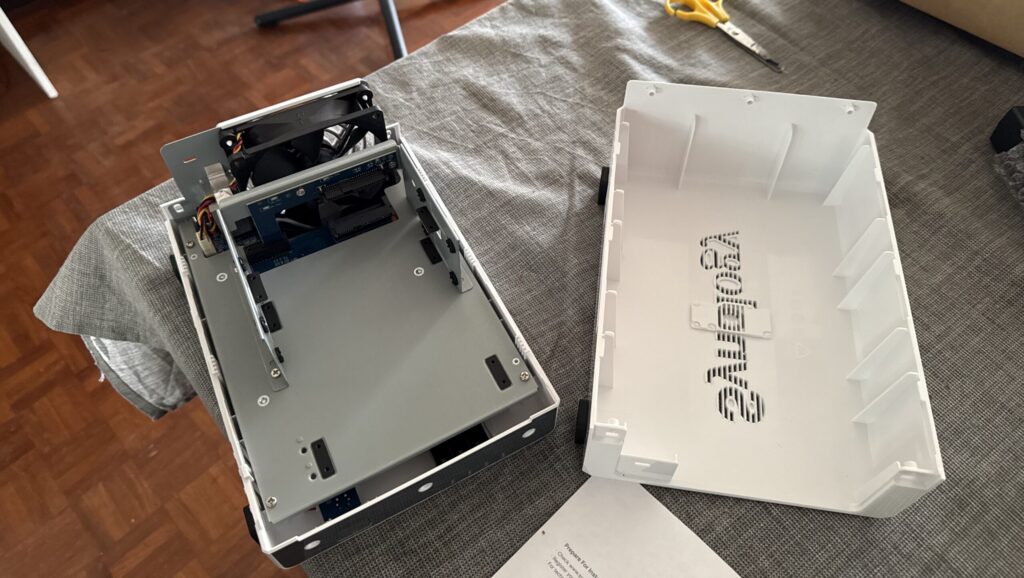
The DS223j does not support hot swap of drives, you need to open up the NAS chassis and install the drives using screws.
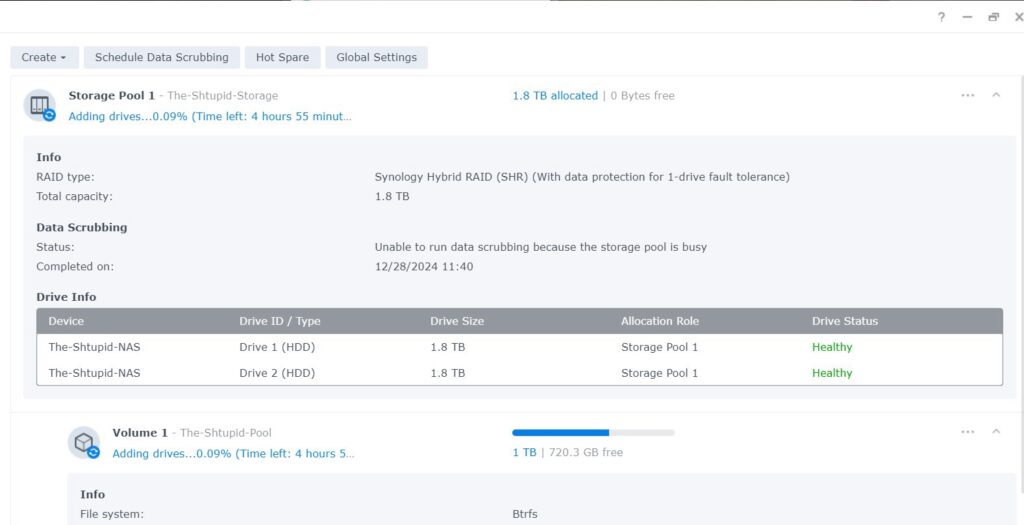
Synology DS223j with 2 hard drivesSynology Hybrid Raid with Fault Tolerance
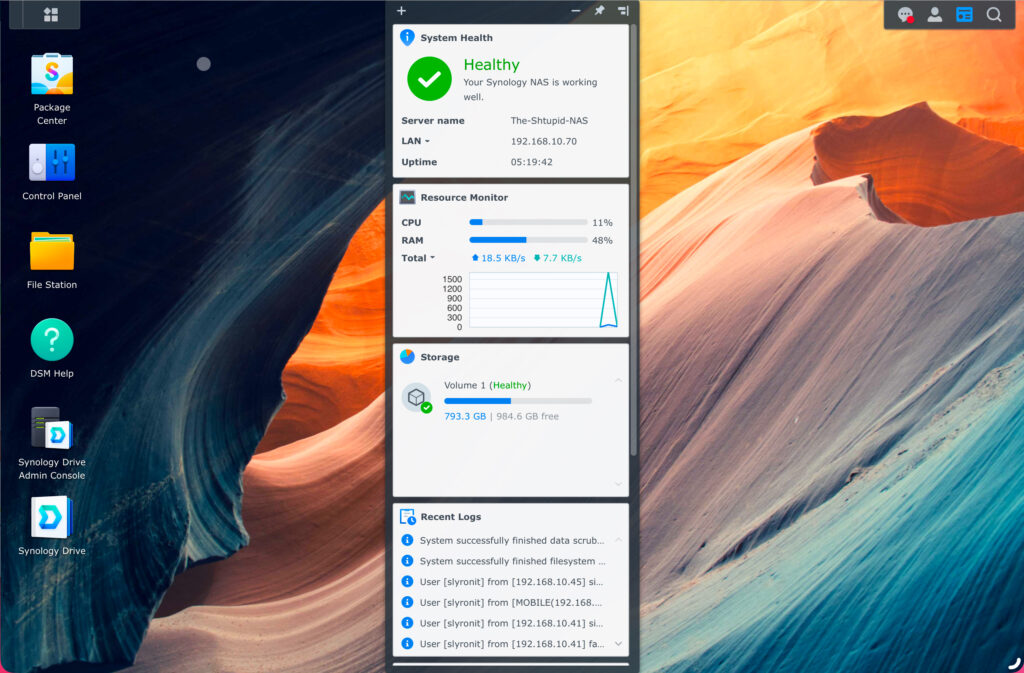
Synology DSM 7
Synology DSM is a web based interface to access your NAS. It is extremely intuitive and powerful. The first time it needs to be accessed using the local IP; once signed in to the Synology account, you can access it via Synology’s cloud-based web app (QuickConnect).
Synology DSM 7.2.2
Although Quickconnect can allow inbound connections to your server natively using UPnP, I strongly recommend keeping that disabled on your router and using manual port forwarding rules, instead. It can also check if you configured your router correctly or not.
DSM 7 Control Panel Port Forwarding check
The Control Panel lets you configure almost any aspect of the NAS, I didn’t have to login using the Linux Terminal even once.
There was a short learning curve over a few days to understand what “storage space”, “volume”, “shared folders” meant and I was able to settle down on the configuration in a few days.It even lets you adjust the brightness of the LEDs on the front of the unit and auto-change them during different times of the day. (The Blue Power LED is especially irritating early mornings).
Next, its time to install apps.
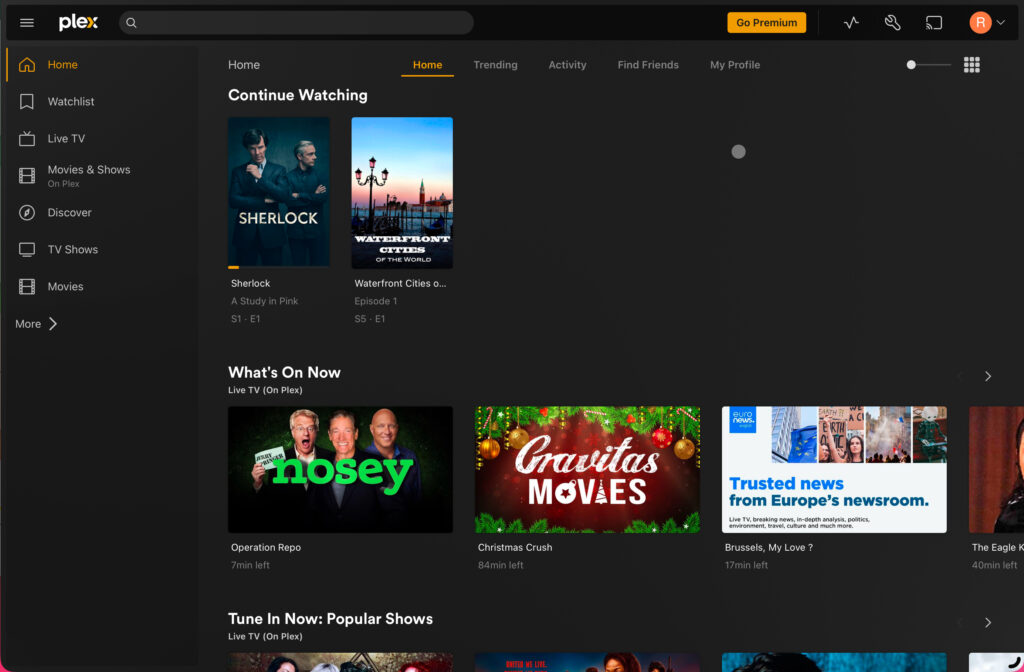
Media Server-1 : Plex
Media sharing was the primary reason for getting the NAS. I created a separate encrypted Shared Folder to store my media on.
I spent sme time researching and comparing Plex, Jellyfin and Emby. I installed Plex because the Pros outweighed the cons
Plex Pros
Functional, powerful settings
Fast Library scanning
Cloud/Plex Account based connectivity <—Some self-hosting purists would consider this a con
Accurate metadata retrieval
Natively installable from Synology Package Manager
Plex Cons
Hardware transcoding does not support ARMv8 processors.
Hardware transcoding is a paid feature.
Interface is cluttered, Plex tries to shove its streaming services down your throat (Can get around this by using A 3rd party client like Infuse)
Plex Relay is massively bandwidth limited, even with a paid subscription. Without this, need to pay for a public IP and also setup port forwarding.
Plex can see what you have and what you’re watching.
Plex Client, via browser
Once installed, the web interface is enabled. You only need to use the local web interface once to sign in to your Plex account. Further access can be via Plex’s cloud-based web app.
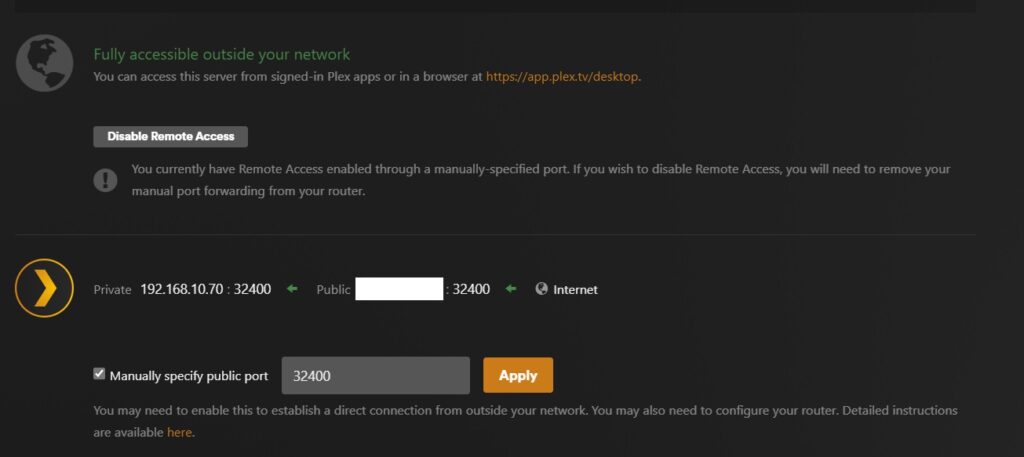
Although Plex can allow inbound connections to your server natively using UPnP, I strongly recommend keeping that disabled on your router and using manual port forwarding rules, instead.
Plex Port Forwarding Setup
It can also check if you configured your router correctly or not.
Streaming performance is great even without transcoding. I never saw the CPU go above 30% when streaming, nor did I experience skipping and buffering.
Media Server-2. : Jellyfin
I also installed Jellyfin to test it against Plex.
Jellyfin Pros
Completely open source
Completely free
No requirement to have a JellyFin account (The connection is directly between the client and the NAS)
Jellyfin Cons
Indexing is slow and painful.
Movie/V Show matching is not as accurate as Plex
Requires more technical involvement to get it working
Since there’s no cloud component, you have to manually choose between a local connection and an internet-based connection (Some may consider this a Pro)
On Synology, the easiest way to get Jellyfin up and running is as below:
Install Jellyfin from Synocommuity using this guide
Enable https access for Jellyin
Set up Dynamic DNS and SSL certificate using this guide
Set up reverse proxy on DSM and point it to Jellyfin using this guide
On clients, you can install the Swiftfin client. However, there’s a catch:
For devices like TVs, you will obviously connect to Jellyfin server using your local IP
For mobile devices like iPhone/iPad, the switching is not automatic (Like Plex). When on the same network, you need to connect (over http) using the local IP, when outside, need to connect (over https) using the dynamic DNS name set up previously. I didn’t bother and set up the WAN connection permanently. This means even when I am at home, I am streaming over the internet.
The interface is cleaner than Plex, as in it is not trying to shove its own services down your throat.
Eventually I found Plex to be a better match for me and got rid of Jellyfin.
Private Cloud : Synology Drive
Having a second backup of all my photos (First backup is on iClown) was the other reason for buying the NAS.
The NAS comes pre-installed with Synology Cloud Sync, which can automatically sync with a public cloud. I would have preferred this way, but unfortunately, iCloud is not among the list of supported clouds (The fault is likely on Apple’s side for locking down their ecosystem). So I decided to use my iPad to backup photos from my iCloud to the NAS.
Now, there’re two apps which you can use to backup your photos From your iDevice to your NAS – Synology Drive and Synology Photos. Synology Drive works quite like the Google Drive and OneDrive apps; it can be used for file management and backup. Synology Photos, on the other hand focuses on photos and can also act like a media gallery. Both can backup photos equally well and do, to the same location on the NAS. Both apps are quite well built and designed.
I wanted to treat my photos as files and didn’t want the photo management features, so I went with Synology Drive.
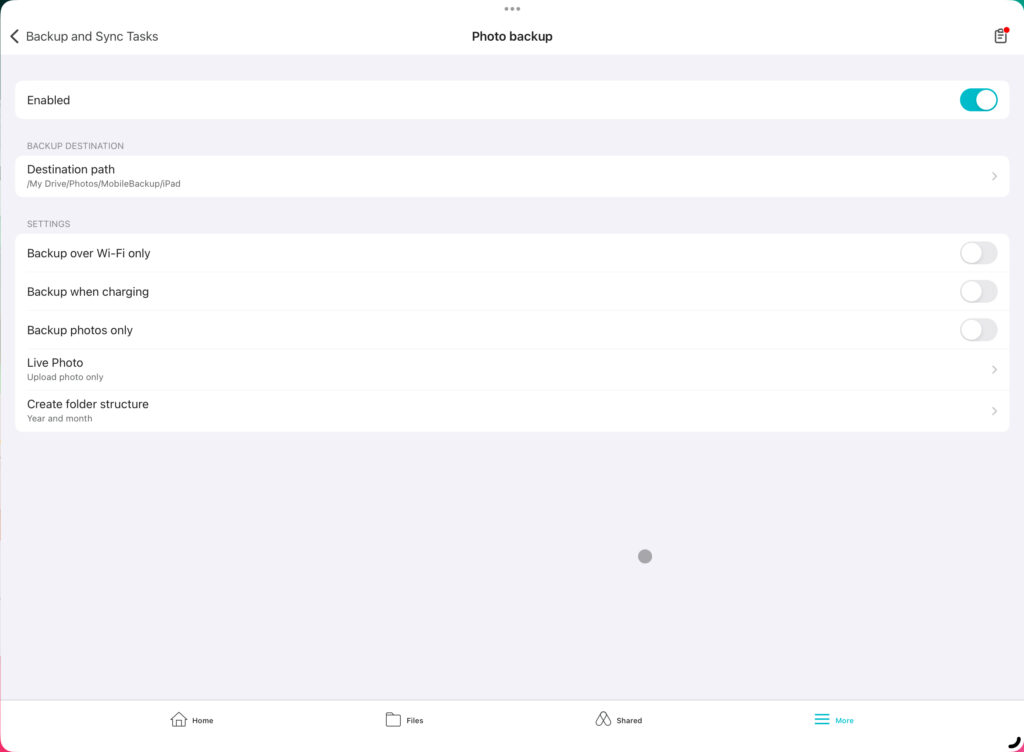
The options to backup files and photos are quite extensive.
The app automatically backs up new photos in the background, but this process is quite throttled because of Apple’s restrictions. For the first upload, there’s a special focussed backup mode which can keep the app in the foreground, but lower the screen brightness. Using this, I was able to upload all 18000 photos and videos overnight.
Synology Drive Focussed Backup
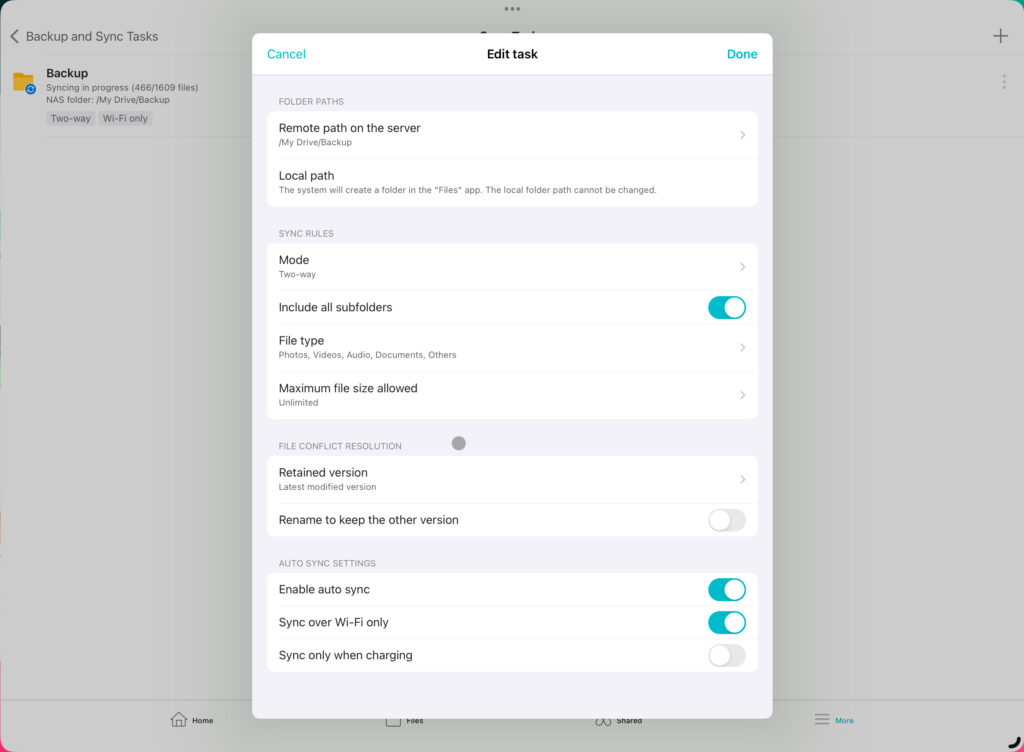
Backing up files and documents is a more manual process. You need to frequently copy your files to a dedicated sync folder and the app syncs them from there on.
Synology Drive sync task settings
Apart from requiring manual sync every few days, your device also needs to store 2 copies of each file, which is not ideal. Luckily, it takes less than 10 minutes to upload <20GB of documents (~1800 files).
It’s also a waste of bandwidth, because it synced and overwrites everything, every time, not just changes.
Local Storage : SMB
For local storage and backup, I debated between SMB and AFP. Although AFP did provide faster transfer speeds, I went with SMB because of dwindling support for the former.
DSM provides granular control for multiple users, allowing you to choose which user can access which part of the file system. Eg, I created a separate account for my daughter and assigned a file storage quota on a dedicated shared folder for her MacBook to make nightly automatic backups using Time Machine.
IoT Management : Homebridge
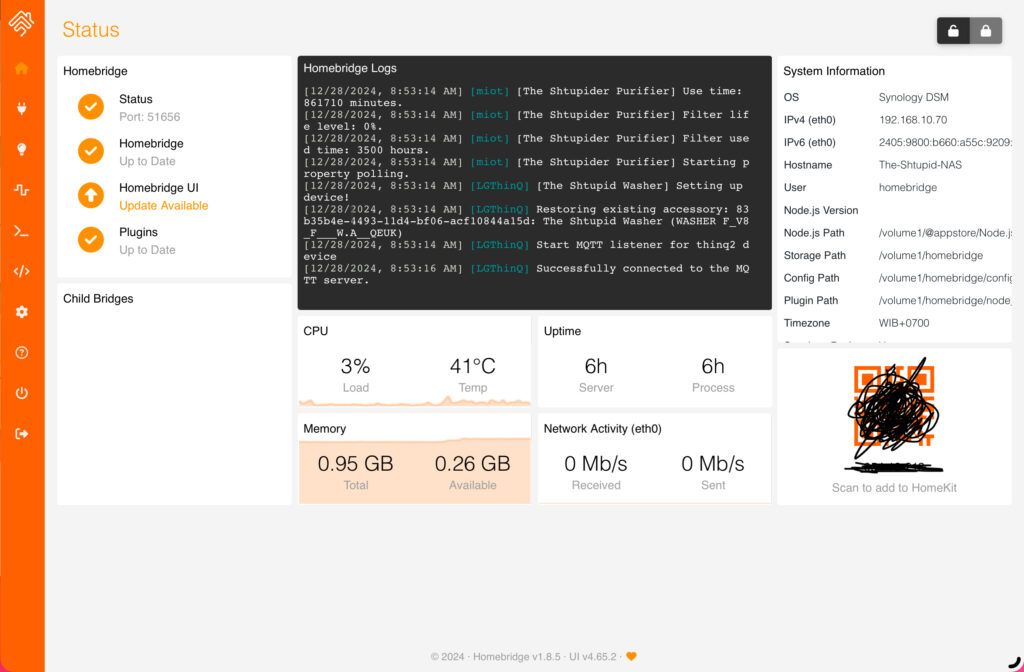
Homebridge allows your NAS to emulate itself as an Apple HomeKit bridge, which further allows you to see non-HomeKit accessories in your Home app. The app is completely open source, and so are the plugins. Ideally you need 1 plugin for each non-HomeKit device you have. I used the below plugins
Your IoT devices need to have a consistent IP address on the local network, I suggest setting up DHCP binding on your router. Some of the plugins have quite an involved process of adding devices, but thankfully it is a one time thing. Once done, the data from your accessories will appear in the Homebridge UI.
Homebridge showing data from IOT
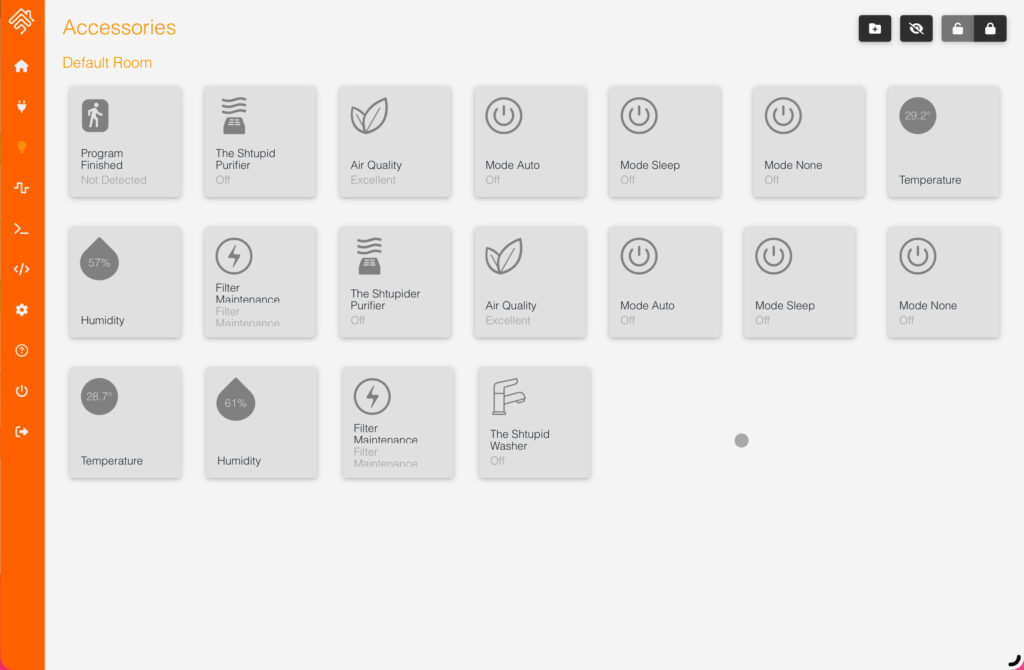
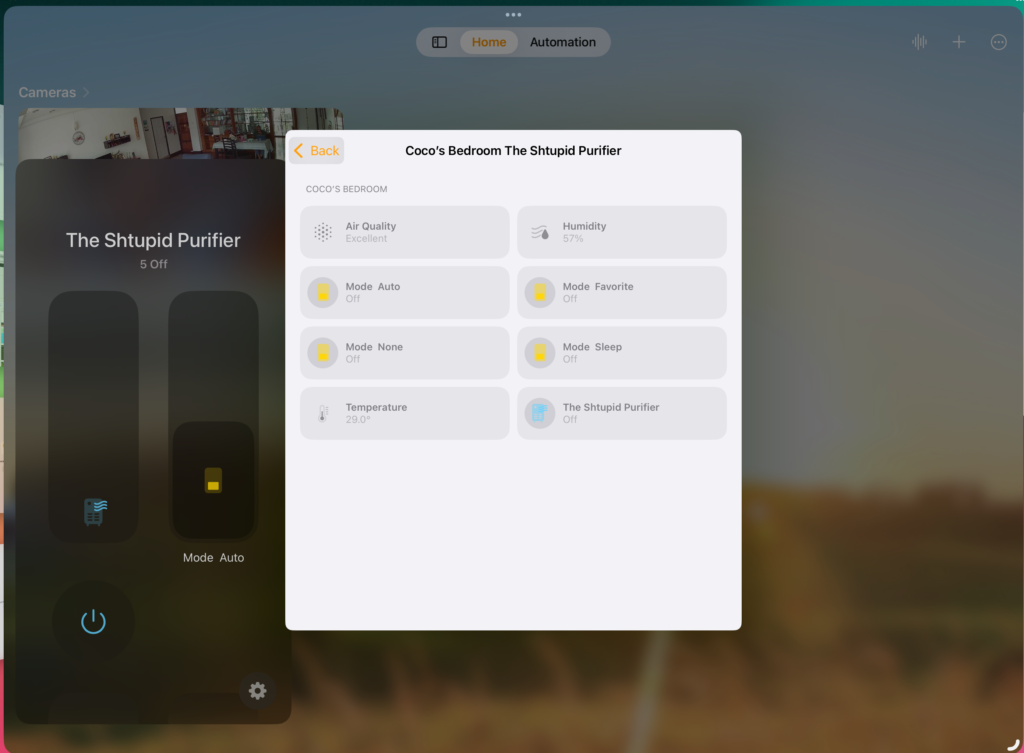
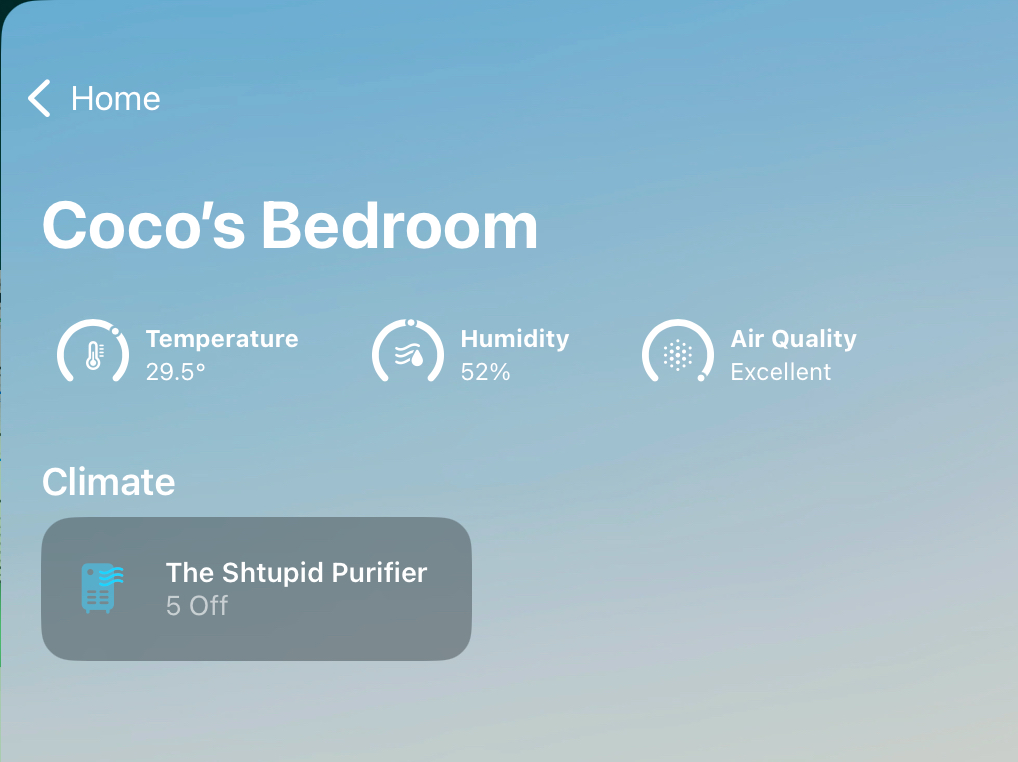
Once you add your Homebridge as a HomeKit bridge in your Apple Home, the data is further relayed to the Home app on all your devices.
Xiaomi Air Purifier data on Apple HomeKit via HomebridgeApple Home Room statistics
The experience is not as seamless as native HomeKit devices and this is not what I bought the NAS for, but it was a pleasant bonus, nonetheless.
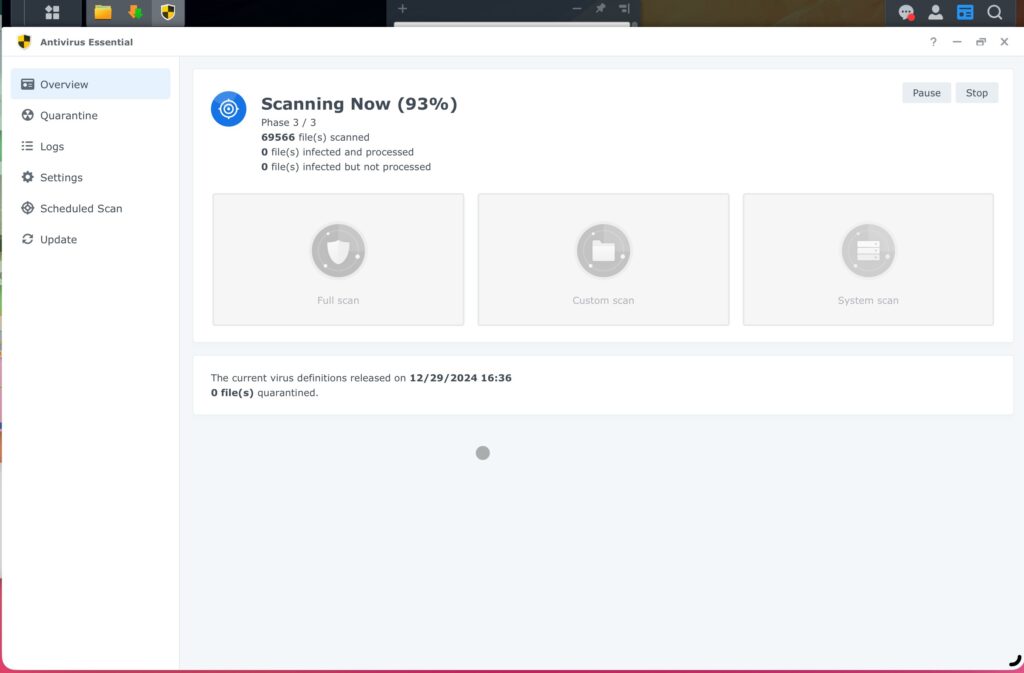
Antivirus : Antivirus Essential
Antivirus Essential is Synology’s antivirus solution. I am not sure how effective it is, but it is a pain to run the first time. The first “full scan” took 4 days with the NAS too busy to do almost anything else during that time. Even the first time update of virus definitions takes hours.
Antivirus Essentials on Synology DSM
Thankfully, if you enable “smart scan”, subsequent scans are much faster (Around an hour).
Probably the performance is much better on more powerful units.
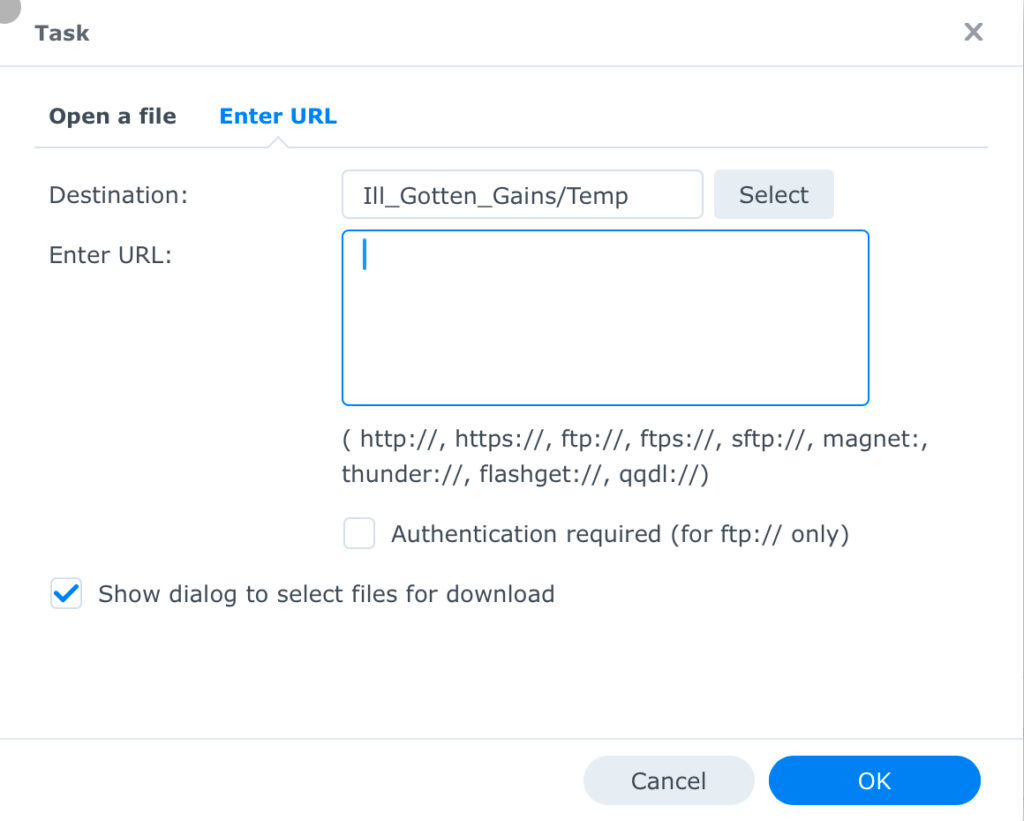
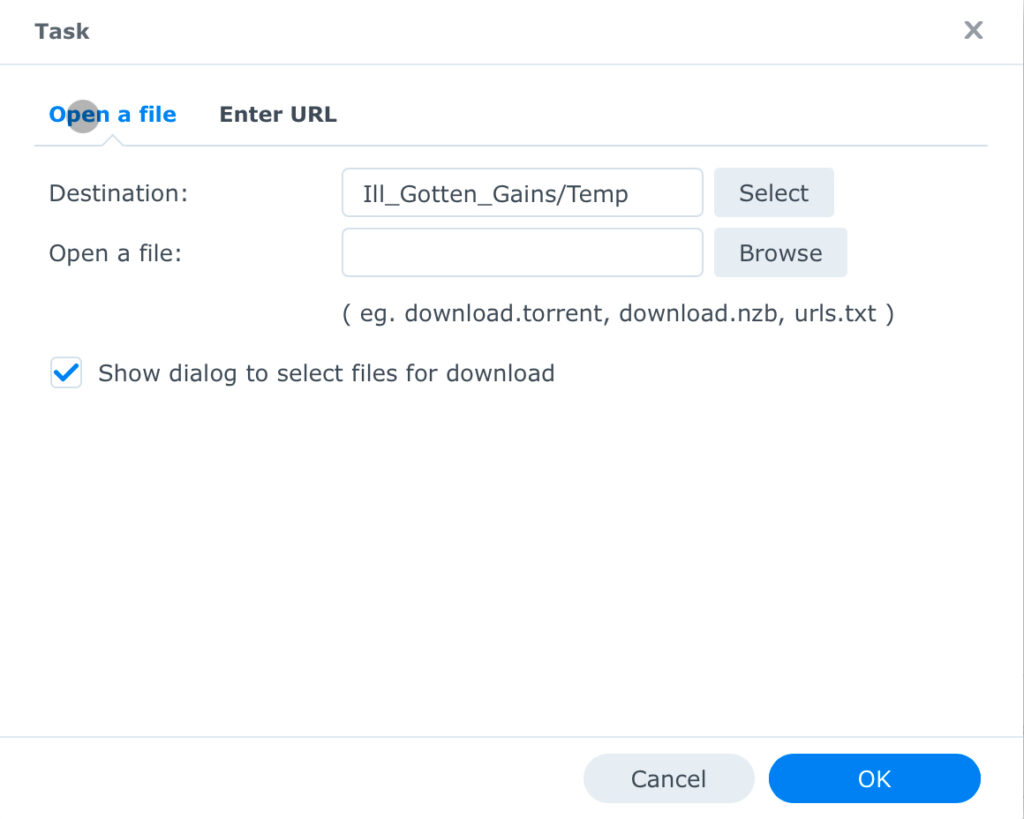
Download Manager : Download Station
Download Station is Synology’s web based download manager. For a first party app, it is quite powerful. It can download files from a wide variety of URLs & P2P file types.
Synology Download Station URL dialogueSynology Download Station file dialogue
You can even download using RSS feeds. It is not as powerful as some dedicated clients, but it is good enough that I don’t use a 3rd party utility.