Tag Archives: Cloudflare

Bye Bye Jetpack? Not so fast!

For those who don’t know, Jetpack is Automattic’s WordPress plugin, which connects your blog to their cloud service and provides a number of features.

I have been using Jetpack for as long as I remember having this site on WordPress. And for most of the time, it has worked well.
However, recently, I noticed that when composing posts, the block editor would get stuck “saving” and not recover at all. Over many months, it led to hours of lost work. After troubleshooting thoroughly, I found that the problem only happened when Jetpack was enabled.

Jetpack broke post saves on this blog

After begging a few days on their support forums and not receiving any response, I decided to ditch it once and for all and look at other options.

I knew there’s no single plugin that can replace Jetpack in totality, but when I made a list of the Jetpack features I use and how many plugins it would take to replace it, I was shocked.

Below is a description of what I did.

Social Media Share Icons

I decided to start with the easy items and immediately found “Simple Social Icons” to replace Jetpack’s social share icons.

Share button integration with Jetpack
Simple Social Icons by Osompress

All good. Let’s continue.

Commenting System

WordPress’s default commenting system requires a person to create an account on your blog before they can comment. Obviously this is not practical for blogs like mine where no one would bother to do this. So I tried 2 options:

Disqus

I was already familiar with Disqus, because I used it on my blog long ago, but I seem to have forgotten that it shows advertisements. I have kept my blog proudly clean over decades, why would I let a plugin display ads? Hard pass.

Advertisements in Disqus’s comment system

More things against this plugin were the requirement to create & maintain a Disqus account and it maintaining your comments on its servers, rather than integrating with WordPress’s comments (At least by default).

wpDiscuz

In-spite of the childish name spelling, this plugin was quite powerful, even with the free iteration.

wpDiscuz Comment Examples

This plugin actually out-performs Jetpack by allowing users to login with many different social media accounts (Jetpack allows only WordPress and Facebook accounts).

Related Content

Jetpack’s related posts carousel

I like showing related posts at the end of each post and YARPP (Yet Another Related Posts Plugin) did a good job. Not much to write about this.

Downtime Monitoring

For downtime monitoring, I chose Pingdom’s service. The service is quite powerful, generating detailed stats, certainly more so than Jetpack which only shows up/down alerts. However, I realised later that the free tier only supports monitoring for 30 days. Since I don’t earn any money from this website, I decided to forego this feature and stay in the blind.

Pingdom’s site monitoring tool

Fetch images directly from services

Jetpack’s image fetch tool

Jetpack has this nifty feature which allows you to insert royalty-free images directly from multiple image services (vs finding an image, verifying the license, saving it, then uploading it). I mostly use it for the cover image of each post.

To replace this, I found Instant Images, which allows fetching images from even more platforms.

Infinite Scroll & Lazy Load

For this, I chose WordPress Infinite Scroll – Ajax Load More, which does a good job.
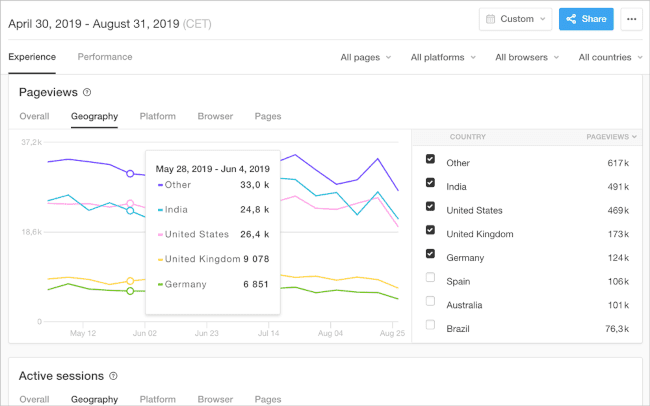
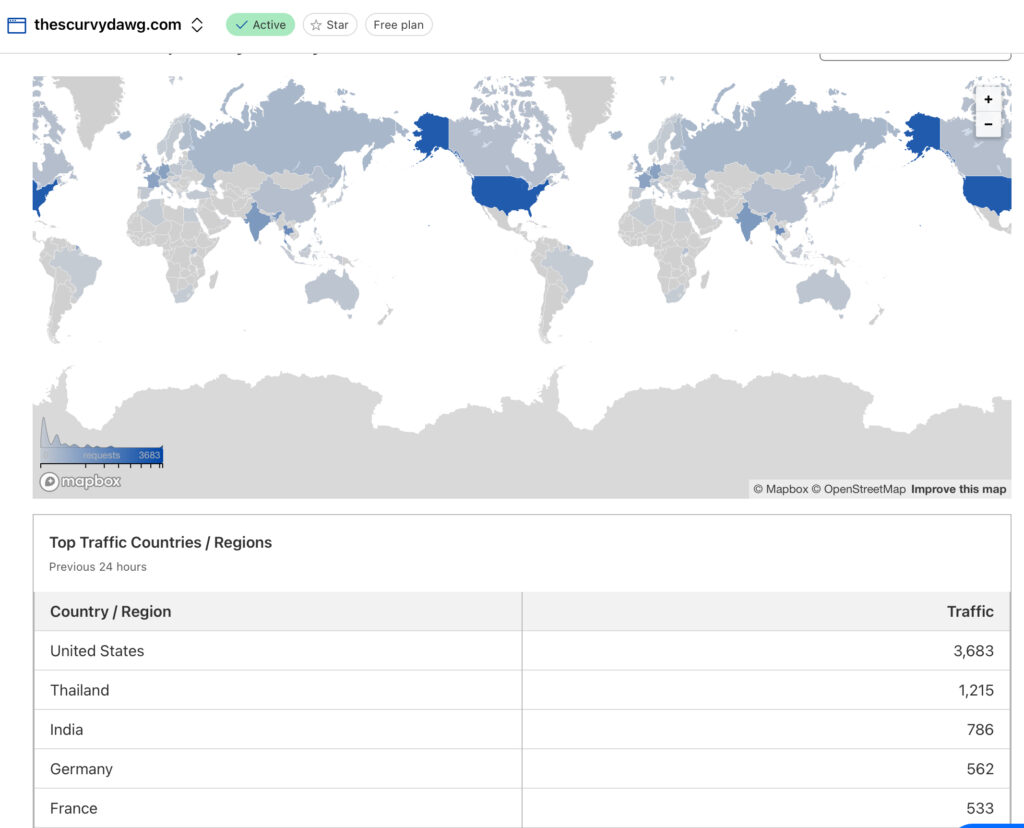
Site Statistics

Cloudflare statistics example for this blog

WordPress shows you graphs of how many people visited your blog and from where. This data is widely disputed to be flawed. Since I was already using Cloudflare, I chose Cloudflare’s stats for this.

However, I didn’t find a way to view these statistics in a formatting suitable for mobile displays.

Cloudflare statistics: Requests by country

Email Subscription & Sign Up Form

I saved the most complicated for the last and eventually this was the item which eventually caused me to give up.

Basically, I wanted people to be able to sign up to my blog newsletters via a sign-up form on the blog page and then receive notification emails when there’s a new post. Simple, right? Not so

MailChimp & MC4WP
MailChimp
MailChimp

MailChimp is the world’s leading email marketing platform. You can use it for free if you have less than 2000 subscribers, which is not a problem for me.

Signing up for an account and starting a campaign requires a lot of verification (To prevent spam, they say), but I was done in an hour, including importing my existing subscribers via a .csv file.

MC4WP
MC4WP

To make a subscription form on my website for people to type their email addresses in, I used MC4WP, which is a nifty tool which can update the subscriber’s list on your MailChimp account.

The free account was suitable for my needs.

However, I got stuck on the next part, which was to automatically send a notification email to my subscribers when there’s a new post. There doesn’t seem to be a native way to do this. The method recommended by MailChimp is to set up a “classic” automation which would read from an RSS feed of my blog and trigger the email sending. However, this feature was paid and I didn’t want to pay to send emails to 30 subscribers. On to the next option, then.

Icegram Express
Icegram Express
Icegram Express

The big advantage of Icegram Express was that it all runs natively within your WordPress installation, without a need for an account with them.

It took me 20 minutes to configure everything and setup the automations. However, when I tried testing the email digest (I tried both WPMail and PHPmail), it would only send emails half the time. The other half, it would say it sent the email, but the recipient would never receive it.

I tried my best, but I couldn’t find another alternative.

Eventually, I took stock of where I was. I had replaced Jetpack with 5 different plugins, created accounts with 3 new services and still I was nowhere near the functionality Jetpack provided.

I made the hard decision to give up and go back to Jetpack, with a new found appreciation for how useful this plugin actually is & how much it does for free.

If I edit my posts in Firefox, I don’t run across the “saving” problem anymore, however, I have raised a feedback with Apple to hopefully get it fixed.

Homebridge & Plex on Home Server

I recently did some pretty complicated configurations on my Synology NAS & subsequently the Mac Mini & decided to make diagrams to document how things communicate with each other. The below sections describe the traffic flow for Homebridge & Plex on my home server.

Homebridge

The Homebridge traffic flow is relatively straight forward.

Traffic flow, Homekit

Homebridge acts as a bridge between IoT devices and Apple’s HomeKit. There are many 3rd party plugins for different types of devices. The plugins are searchable/downloadable from the app itself.

Homebridge Plugins : LG ThinQ & Miot

The traffic flow goes like:

  1. Homebridge polls your IoT devices regularly (depending on how the plugins are built) and gets status information, storing it in a local database
  2. Homebridge shows up as a HomeKit bridge to your HomeKit home hub and exposes all its connected accessories.

There’s a fair bit of mDNS involved for device discovery, so make sure your router allows Layer 2 multicast between the wired and wireless networks.

Plex

There are 2 use cases here, both a bit complicated

Plex Home Media Streaming

Traffic flow, Plex Media Streaming

Plex Media Server is installed on my Mac Mini and can access all my media.

For devices on the local network, streaming is straight forward, the devices access Plex Media Server and stream the media.

Plex Streaming graph

For devices on the internet, I needed to setup a Cloudflare tunnel for remote access. This is because my ISP doesn’t provide a Public IP via which I can establish direct inbound access. Cloudflared establishes a tunnel outbound from my NAS to Cloudflare’s servers. Devices on the internet use DNS mapping on a domain name to locate the tunnel endpoint and stream media through it.

Plex IPTV Streaming

A few weeks ago, I figured out how to integrate my IPTV service with Plex. Now, Plex by itself doesn’t support IPTV services, but it does support TV tuners. That’s where Threadfin comes in.

Traffic flow, Plex IPTV Streaming with threadfin

So, there are 2 separate, independent traffic flows we need to consider.

IPTV Control Traffic

Before IPTV streaming can start, all the devices involved need to have the correct information. This is how it goes:

  1. Threadfin fetches the channel list from the IPTV provider using an authenticated .m3u playlist
  2. Threadfin fetches the programme guide from the IPTV provider using an authenticated .xml file
  3. Threadfin allows you to filter both the above to reduce the list of channels sent to Plex.
  4. Threadfin exposes itself as a TV tuner to Plex. Plex fetches the filtered list of channels and EPG information from Threadfin.

One quirk with Threadfin is that it stores the original playlist in its memory, so the container may use up a lot of RAM. My container was using 2.6GB RAM with 113k channels in the playlist. After I asked my IPTV provider to trim it, currently it is using 800MB with 37k channels.

IPTV Media streaming

Threadfin doesn’t participate in the actual media stream. When a channel is selected on Plex to be viewed, Threadfin provides Plex with the actual streaming URL.

Once Plex has the original URL, it starts fetching the stream directly from the IPTV server and provides it to all client devices, local or remote, using the same mechanism as media streaming.

Bye-Bye Synology, Hello Mac Mini

I had been using my Synology NAS for a few months now. However, as I started to do more and more with it, its inherent lack of processing power started to irk me. The CPU was too slow, the RAM too limited. More than that, its ugliness on my living room shelf disgusted me. Eventually, I decided to replace it with a Mac Mini.

Synology DS224+ next to my Mac Mini

Since I was anyways using the NAS more as a computer than for storage (a measly few hundred GBs), the choice was not difficult. I got a good deal on a used Mac Mini M2 Pro and went about migrating my data and services from the Synology.

Remote Access

Since I planned to use the Mac Mini as a headless server, the first thing I needed to do during setup was enable remote access. I used my TV as the initial display. Luckily, macOS has built-in VNC & SSH servers and enabling them was as simple as checking a few boxes.

Remote Management and Remote Login, macOS
Remote Management, macOS

With an Apple only environment, you can have better security by

  1. Selecting the “Remote Management”, not the “Screen Sharing” option
  2. Not selecting the “VNC viewers may control screen with password”
  3. Using VNC over SSH when connecting with clients over the internet

The above will break compatibility with most commercial VNC applications. I like Screens 5 & Termius for VNC and SSH respectively. Both apps are paid, but quite powerful.

After verifying that remote access was working, I disconnected the TV, keyboard and mouse for good & haven’t needed them since.

Docker & Threadfin

The service I was most worried about was Threadfin, because it is not natively supported on the Mac and I need to run it within docker.

Thankfully, docker desktop works quite seamlessly on the Mac and the settings & environment variables look similar to container manager on Synology. My only problem was, I couldn’t get the container to auto-start after reboots, using environment variables in the GUI. Eventually, I could get it to work via the terminal

docker update --restart always <container_id>

Once it worked, I could clearly see the performance difference. While on Synology, the container took approx 2-3 mins from start to being usable, on the Mac, it takes less than 10 seconds.

PS: You can’t fetch new images from docker’s repository till you click on the verification link sent via email, if you have created a new account.

CloudflareTunnel

Cloudflare tunnel is installed via homebrew. It is as simple as copy/pasting a few commands via Terminal. Since the configuration of the tunnel is handled from the Cloudflare dashboard, there are no further steps required on the Mac itself.

Bonus feature, Cloudflare also allows you to setup VNC & SSH connections to your device, exposing a web interface to any browser you want to use it with. Over the same tunnel.

Plex & Homebridge

Plex is supported natively on the Mac and installing it is as easy as mounting the disk image. It detected Threadfin as a DVR fairly easily.

At first, Plex refused to detect media content from my external SSD, which was an APFS encrypted volume. However, after erasing it and setting it up as un-encrypted, it was detected fairly quickly. Funnily, once I encrypted it again, it continued to work, so I am not sure what the original problem was.

Homebridge is also natively supported on the mac and is installable via homebrew. Thankfully it comes with backup/restore functionality out-of-the-box, which worked seamlessly. Just had to keep in mind 2 things:

  1. The plugins are not backed up and restored, so these need to be installed on the new machine manually before restoring the backup
  2. I had to delete the bridge from my home app and add it again for my device status to work properly.

Backblaze Backup

Unlike my NAS, there’s no disk redundancy on the mac, so I chose to subscribe for Backblaze’s backup service. It is quite cheap, allows unlimited storage and if you need, they can even send you a USB drive to restore your content from.

Backblaze backup on macOS

It took around 2 days for the client to upload all my data in auto-throttled mode.

qBittorrent

For macOS, most people recommend Transmission to download torrents and the app itself is rock-solid, however, it is lacking support for RSS feeds. One can use add-ons like flexget to enable this, but I couldn’t get it to work.

Eventually, I settled for qBittorrent, which, although dated, has all the necessary features and works quite well. Its web UI is near-unusable on mobile phones, though and I couldn’t find a client on the App Store which works well, yet.

qBittorrent v5.0.5 on macOS

Resource & Environmental monitoring

I use TG Pro to monitor environmental parameters like temperature, fan speeds. It is a paid app, but is quite cheap and requires a one-time-payment only.

I use stats to monitor the CPU, GPU, Memory and bandwidth utilisation on the Mac. It is open-source and installable via homebrew.

Stats & TG Pro on Mac Menu bar

Summary

Overall, what I miss most from my Synology is its easy-to-use web interface and cloud connectivity features, which worked seamlessly. Even after a lot of effort, I cannot achieve the same level of integration on the mac, as all the services are from separate providers & lack cohesion.

However, the sheer computing power and the lack of physical ugliness more than makes up for it.

Cloudflare

I had dabbled with CDN before (LiteSpeed, Jetpack), but a recent requirement around my NAS required me to move my DNS service to Cloudflare. So I thought, why not use their CDN, too and compare the before and after performances?

For web traffic, you can use Cloudflare in two modes

  1. DNS only
  2. DNS plus Proxy

As the names say, the first option uses Cloudflare servers as your authoritative name servers, but your traffic goes straight to your original server. There’s no caching and there’s no CDN.

Turning on the proxy is where the real benefits are supposed to be visible. I used their free plan for testing.

As you can see, I used various tools to test the difference in performance.

Network Latency

Being a network engineer, the first thing I tested was network latency difference between my web server and Cloudflare’s proxy.

I tested from Thailand, and as expected, Cloudflare’s proxy has significantly lower latency compared to my web server, which is based in the US. The benefits may be lower if tested from the US itself.

Pings to domain resolving to web serverPings to domain resolving to Cloudflare’s proxy
Web Server vs Cloudflare proxy Proxy Ping Results

Average 224ms latency vs 36ms.

This means that my users can experience better Round Trip Times to my website globally by connecting to their nearest CDN, instead of all focusing on one server in the US.

But ping is only part of the story. For real-life results, I used the below tools.

I ran all the tests raw with Cloudflare paused and WordPress plugin disabled. Then I re-ran the tests again, one day after enabling both.

Google PageSpeed Insights

Google PageSpeed Insights is an important tool, especially because Google uses this score as a metric to calculate its search engine Page Rankings. It is a bit simplistic, as in it doesn’t let you select a source server. But it does show results for both mobile and desktop.

Google PageSpeed Insights Mobile RawGoogle PageSpeed Insights Mobile Cloudflare
Google Pagespeed Insights Mobile, Raw vs Cloudflare
Google PageSpeed Insights Desktop RawGoogle PageSpeed Insights Desktop Cloudflare
Google Pagespeed Insights Desktop, Raw vs Cloudflare
Google PageSpeed Insights Desktop RawGoogle PageSpeed Insights Desktop Cloudflare

As you can see, there’s a minimal performance gain, which makes sense because Google’s servers are likely in the US, similar to mine.

DebugBear

DebugBear is similar to Google, but also shows a helpful graph of the different activities happening during your page load. Again, only US is available as a location for free.

DebugBear Mobile RawDebugBear Mobile Cloudflare
DebugBear Mobile, Raw vs Cloudflare
DebugBear Desktop RawDebugBear Desktop Cloudflare
DebugBear Desktop, Raw vs Cloudflare
DebugBear Mobile RawDebugBear Mobile Cloudflare
DebugBear Desktop RawDebugBear Desktop Cloudflare

As you can see, there’s an insignificant decrease in the load score for mobile, although desktop being perfect to begin with couldn’t be improved on.

Solarwinds Pingdom

Pingdom has an advantage over the last 2 tools in that it allows you to select a server location to test from. I chose Australia, being far from USA.

Pingdom rawPingdom Cloudflare
Solarwinds Pingdom, Raw vs Cloudflare
Pingdom rawPingdom Cloudflare

As you can see, there’s an insignificant amount of decrease in Pingdom’s score, but the load time and the number of requests are down significantly.

Wattspeed

Wattspeed’s lighthouse tool allows you to test for Desktop and Mobile separately, but doesn’t let you select a source server.

Wattspeed Lighthouse Mobile RawWattspeed Lighthouse Mobile Cloudflare
Wattspeed Lighthouse Mobile, Raw vs Cloudflare
Wattspeed lighthouse desktop RawWattspeed Lighthouse Desktop Cloudflare
Wattspeed Lighthouse Desktop, Raw vs Cloudflare

Significant increase in scores for both Desktop and Mobile.

Overall Verdict

Test ToolRaw ResultsCloudflare Results
Google PageSpeed (M)80/10084/100
Google PageSpeed (D)99/10099/100
DebugBear (M)71/10091/100
DebugBear (D)100/100100/100
Pingdom75/10074/100
Wattspeed (M)82/10099/100
Wattspeed (D)76/10084/100

The verdict is clear, in most cases, Cloudflare provides significant and measure-able improvements in page load times. Considering that the service is absolutely free, it is a no-brainer to use it.

However, performance benefits are not the only advantages

  1. Cloudflare will stop DDoS attacks on your website.
  2. Cloudflare allows you to set up firewall rules to block certain traffic to your website (eg on the basis of geolocation).
  3. Even if your website ever goes down, Cloudflare can continue exposing your website from its cache.